
You’re done recording the episode! Give yourself a pat on the back, crack open a beverage of your choice, and congratulate yourself. That part is over.
Now comes the really creative bit: post-production. This is where we leave the structured realm of tutorial and venture into the whimsical and often-confusing land of your own ideas. Will you post the show uncut and untouched, as an accurate slice of your life? Will you chop out all the mistakes and play with the quality? Will you add music, change effects, or make yourself sound like a Dalek?
Whatever your podcast format, however you choose to edit, I’ll be showing you the basics in streamlining and trimming your audio. However you go from there is up to you.
Audacity’s basic tools
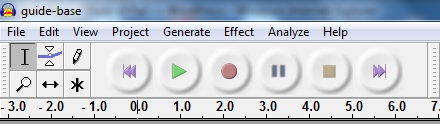
The toolbar at the top changes the way your mouse cursor interacts with the audio. There are six, but you will primarily be using only two. The Select tool lets you place your cursor or select segments of audio. Time Shift lets you drag a track back and forth along the timeline, allowing you to synchronize sounds or place them earlier or later in the audio.
Aside from those tools, you might be using anything from the menu bar. Poke through and play around with them until you’re roughly familiar with what they do. The ones I use the most are “Fade in/out”, “Split”, “Quick Mix”, and “Noise Removal”.
Cleaning up audio
You’ve saved your audio as an .mp3, and converted your tracks if necessary. Open it up in Audacity and give it a quick listen. You don’t have to go through the whole thing just yet; just take a small segment at the beginning and see how everything came out.
If there’s a background hiss or hum, usually due to microphone quality or minor feedback, that will be the first thing you want to clean up. I deliberately used my cheaper microphone so that I had a hiss to take care of here.
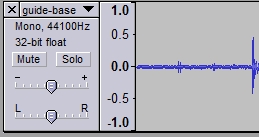
Highlight a stretch of the track where the hissing exists but nobody else is talking. The longer it is, the better; if you can get a full second or two of the sound, that’s perfect. In the “Effect” menu, select Noise Removal, and click “Get Noise Profile”. This will tell Audacity what to look for.

Highlight the entire track (usually by clicking on the track menu itself) and go back to Noise Removal. Put the slider-bar all the way to the left, so that it removes as little noise as possible. This will take out just the hum; allowing it to do more will remove portions of the audio that are similar to the hum, including parts of speech. The more you allow it to do, the more distorted your audio will be.
More Editing
Now it’s time to listen through, cut out things you don’t like, and add whatever extra music or sounds you want to use.
To clip out pieces of audio you don’t want (such as stuttering, excess “um” and “like” and “y’know” usage, and/or dead air), simply highlight the stretch of track and hit Delete. Audio must be stopped, not paused, to make changes.
Adding sound effects and music is very simple! In the “Project” menu, select “Import Audio” and grab whatever files you want! Or, you can just drag them into the Audacity window. Either way, Audacity will convert the file into a visual track for you to edit to your heart’s content.
To synchronize sound effects or music, select the Time Shift Tool, and simply click and drag the track to where you want it to be.
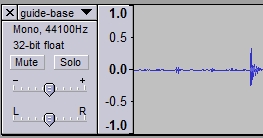
I’m going to add some music to my soundfile, to give it a background.

The song is way too long, but the intro is just right. I’ll clip everything after the singing starts; the easiest way is to place the cursor where I want the music to end, then in the Edit menu, I choose “Select…” and then “Cursor to End”. That highlights everything after the cursor, so I just hit Delete.
It’s also way too loud, so I’ll reduce the sound of the music itself. I can do that by turning down the individual volume dial on the track control panel to the left. I’ll bring it down to -21db.
I want a little bit of musical intro before I start talking, so using the Time Shift tool, I’ll drag the voice audio about one and a half seconds to the right.
Finally, there’s a bit of music left over on the end; I want to fade that out, so I highlight a small portion of the end, and choose “Fade Out” in the Effects menu.
Here’s what that finally looks like!

When you’re ready to compile all that into an .mp3, go to the File menu and select “Export as MP3”. You’ll be asked to enter track information and choose a filename; do what you want with that. The conversion will take a varying amount of time depending on the speed of your computer, the size of the file, and the number of tracks it has to use. On average for a two-hour episode of Made of Fail, the conversion takes about twenty minutes to half an hour.
We’re done with audio! Let’s take a listen to how that came out.